05. AWS CLI - Create EMR Cluster
Create EMR Script
Let's learn how to create an EMR cluster from the CLI, and configure the related settings.
1. aws emr create-cluster command
While creating EMR through AWS console has been shown, but if you know your instances' specificity, such as which applications you need or what kind of clusters you’ll need, you can reuse the aws emr create-cluster command below multiple times.
aws emr create-cluster --name <cluster_name> \
 --use-default-roles --release-label emr-5.28.0  \
--instance-count 3 --applications Name=Spark Name=Zeppelin  \
--bootstrap-actions Path="s3://bootstrap.sh" \
--ec2-attributes KeyName=<your permission key name> \
--instance-type m5.xlarge --log-uri s3:///emrlogs/- Options of the
aws emr create-clustercommand - Let’s break down the command and go over each option to know its responsibility.
--name: You can give any name of your choice. This will show up on your AWS EMR UI.--release-label: This is the version of EMR you’d like to use.--instance-count: Annotates instance count. One is for the primary, and the rest are for the secondary. For example, if --instance-count is given 4, then 1 instance will be reserved
for primary, then 3 will be reserved for secondary instances.--applications: List of applications you want to pre-install on your EMR at the launch time--bootstrap-actions: ThePathattribute provides the path to a file (residing in S3 or locally) that contains a script that runs during a bootstrap action. The script may set
environmental variables in all the instances of the cluster. This file must be accessible to each instance in the cluster.--ec2-attributes KeyName: Specify your permission key name, for example, if it is MyKey.pem, just specifyMyKeyfor this field--instance-type: Specify the type of instances you want to use. Detailed list can be accessed here, but find the one that can fit your data and your budget.--log-uri: S3 location to store your EMR logs in. This log can store EMR metrics and also the metrics/logs for submission of your code.
- Reference - You can refer to an even more detailed explanation about all possible options of the
aws emr create-clustercommand at CLI command reference.
2. Exercise: Create an EMR cluster using AWS CLI
Follow the instructions given below:
2.1. Prerequisite
- AWS CLI - Install AWS CLI on your local computer. Refer to the AWS instructions to install/update AWS CLI (version 2) based on your underlying OS.
- Set up Access credentials using AWS IAM - Generate and save a new Access key (access key ID, and a secret key) locally in your system, which will allow your CLI to create an EMR cluster. You will have to configure the environment variables so that the
aws configurecommand can run properly. - EC2 Login Key-Pair - You should have an EC2 login key-pair to access your EC2 instances in the cluster. You can generate a key-pair from the EC2 dashboard. Remember, a key-pair is a pair of (encrypted) public and (unencrypted PEM encoded) private keys. The public key is placed automatically on the instance, and the private key is made available to the user, just once. Suppose, your private key file name is AWS_EC2_Demo.pem, then you should use only "AWS_EC2_Demo" in the script below, with the option
--ec2-attributes.
2.2. Create an EMR Cluster
- Create default roles in IAM - Before you run the
aws emr create-clustercommand, make sure to have the necessary roles created in your account. Use the following command.
aws emr create-default-rolesThis command will create EMR_EC2_DefaultRole and EMR_DefaultRole in your account.
- Launch your cluster - Run the script below to launch your cluster. Be sure to include the appropriate file names within the
<>in the code. - [Optional] Specify your bootstrap file - You should save an executable (bootstrap_emr.sh file) in an accessible S3 location. You can specify this option as, for example,
--bootstrap-actions Path=s3://mybucket/bootstrap_emr.shin the script below. A sample file is provided in the Github repo here.
# Add your cluster name, and EC2 private key file name
aws emr create-cluster --name <YOUR_CLUSTER_NAME> --use-default-roles --release-label emr-5.28.0 --instance-count 3 --applications Name=Spark  --ec2-attributes KeyName=<YOUR_EC2_KEY_FILE_NAME> --instance-type m5.xlarge --instance-count 3 --auto-terminate
Notice two things in the command above.
One, we have added the
--auto-terminateoption to terminate the cluster after completing all the steps because EMR clusters are costly. However, you can ignore this option, and terminate the cluster manually after your job is done.Two, we haven't specified the
--bootstrap-actionsoption. This step is optional.The expected output should look similar to this:
 "ClusterId": "j-2PZ79NHXO7YYX",
"ClusterArn": "arn:aws:elasticmapreduce:us-east-2:027631528606:cluster/j-2PZ79NHXO7YYX"- You can either go to AWS EMR console from your web browser or run the command below to verify if the cluster is created successfully.
aws emr describe-cluster --cluster-id <CLUSTER_ID FROM ABOVE>A copy of the exercises are also available in the lesson git repo:** Link to Github**
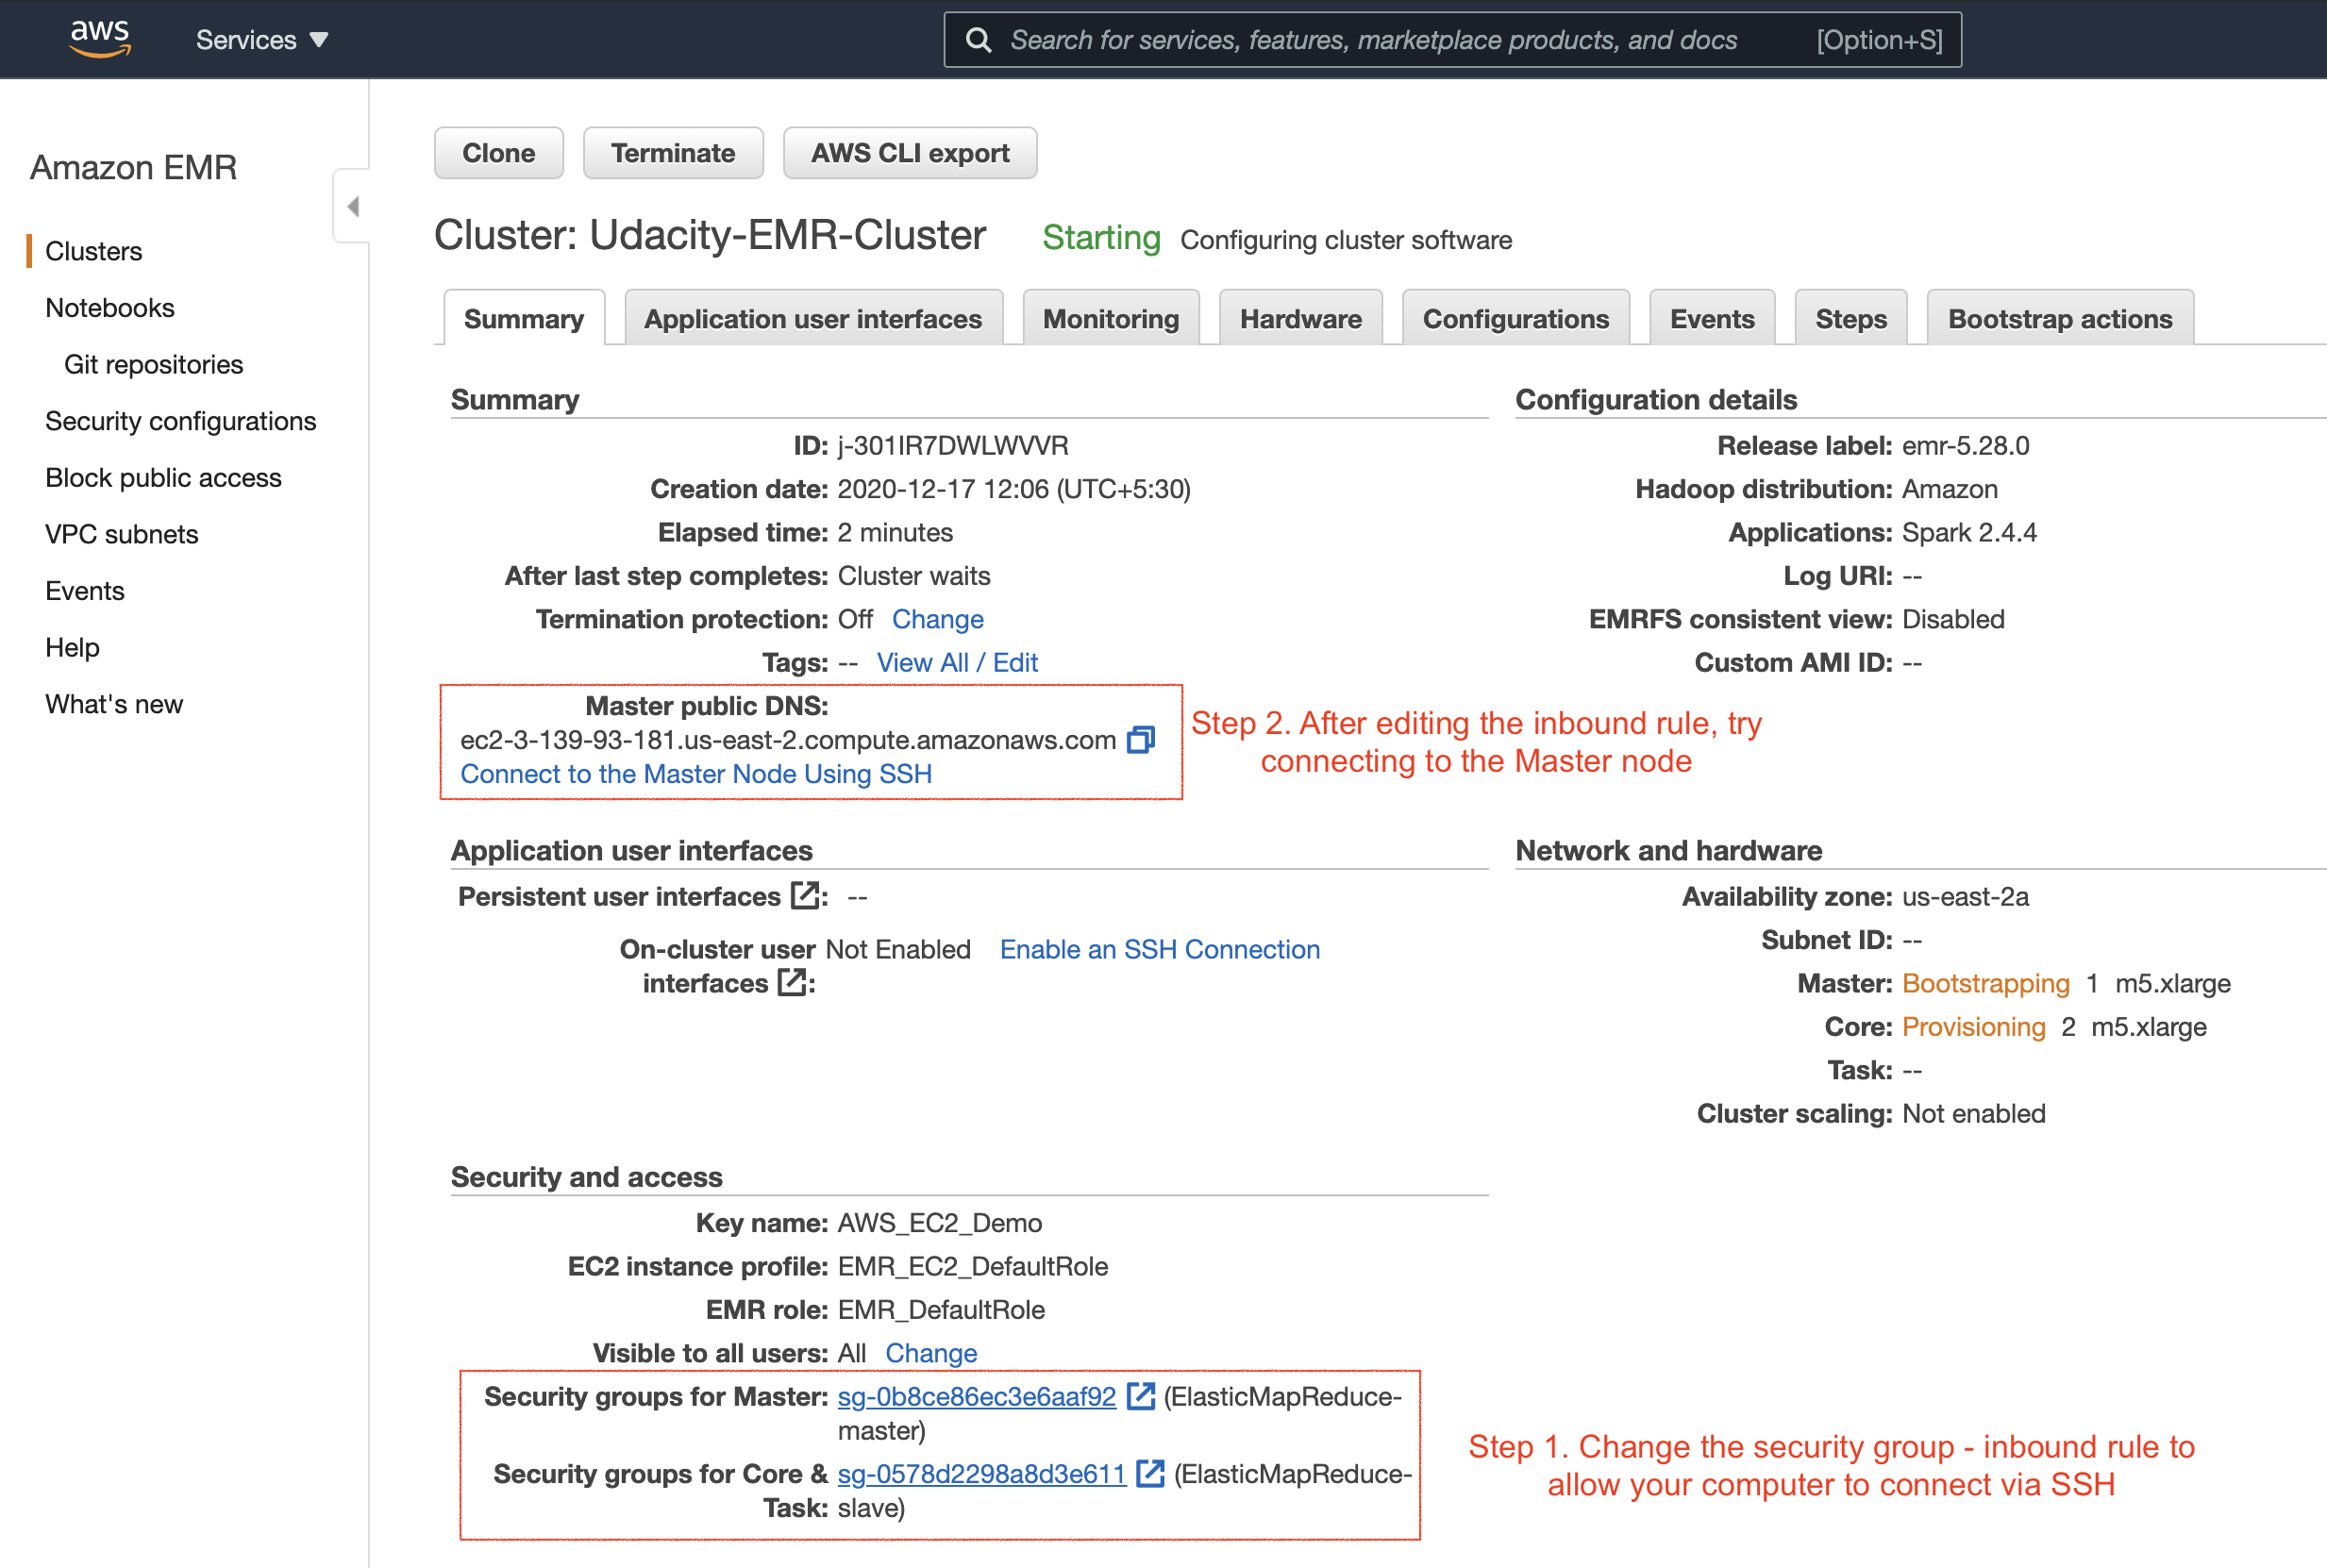
Summary of the newly created cluster. The next set of steps are also highlighted above.
- Troubleshoot - Refer here if you get "EMR_DefaultRole is invalid" or "EMR_EC2_DefaultRole is invalid" error.
2.3. Change Security Groups
After successfully launching the EMR cluster, the master and core (slave) EC2 instances will launch automatically. Next, we will try to log in to the master EC2 instance on the EMR cluster using the SSH protocol (allows secure remote login). Therefore, you’ll need to enable the Security Groups setting of the master EC2 instance to accept incoming SSH protocol from your local computer.
The master and slave nodes are associated with a separate security group. You can view the security group ID either in the EMR console → Clusters or you can go to the EC2 dashboard → Security Groups service, as shown below.
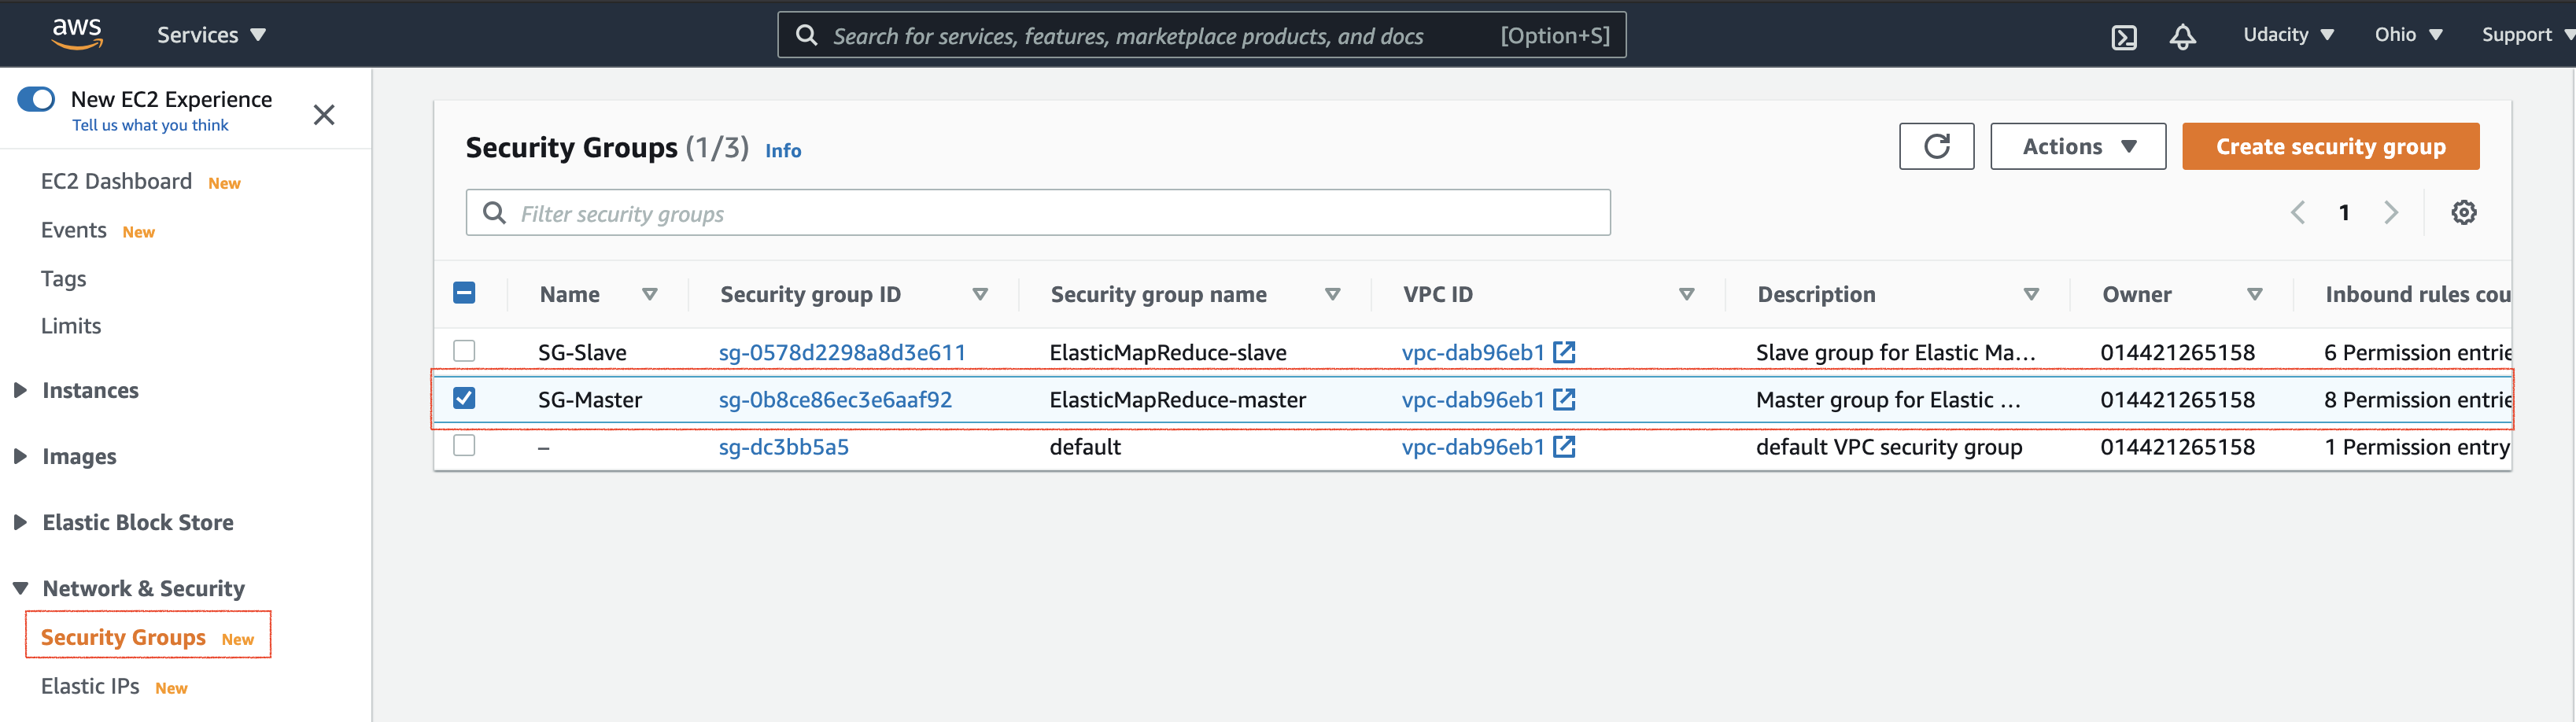
Select the security group associated with the master
- Edit the security group to authorize inbound SSH traffic (port 22) from your local computer.
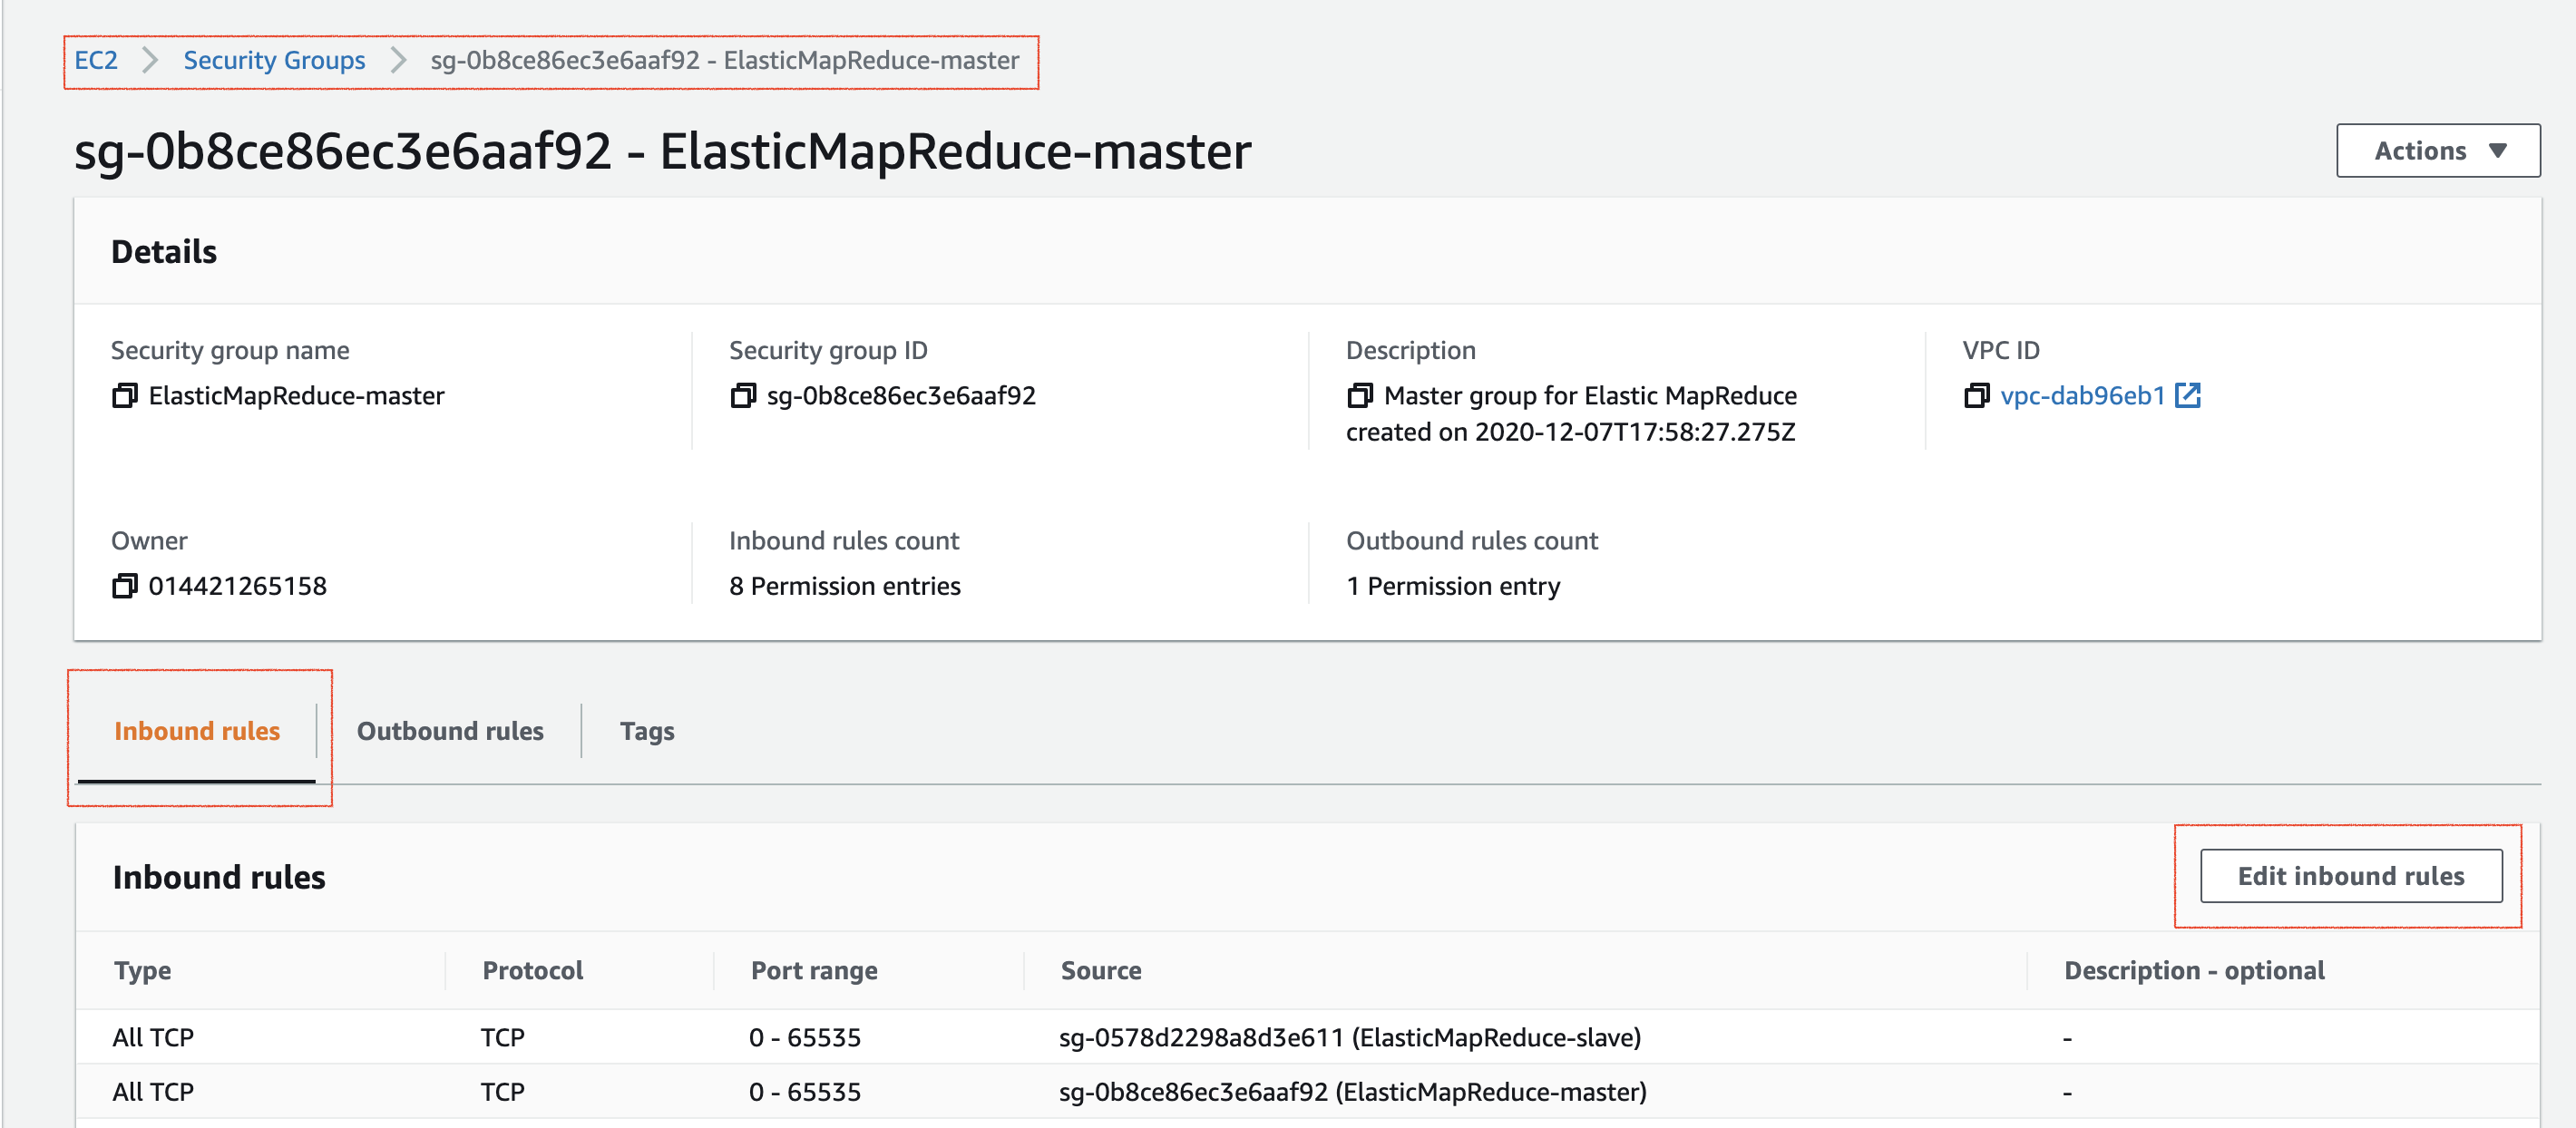
Edit the inbound rules of the master node
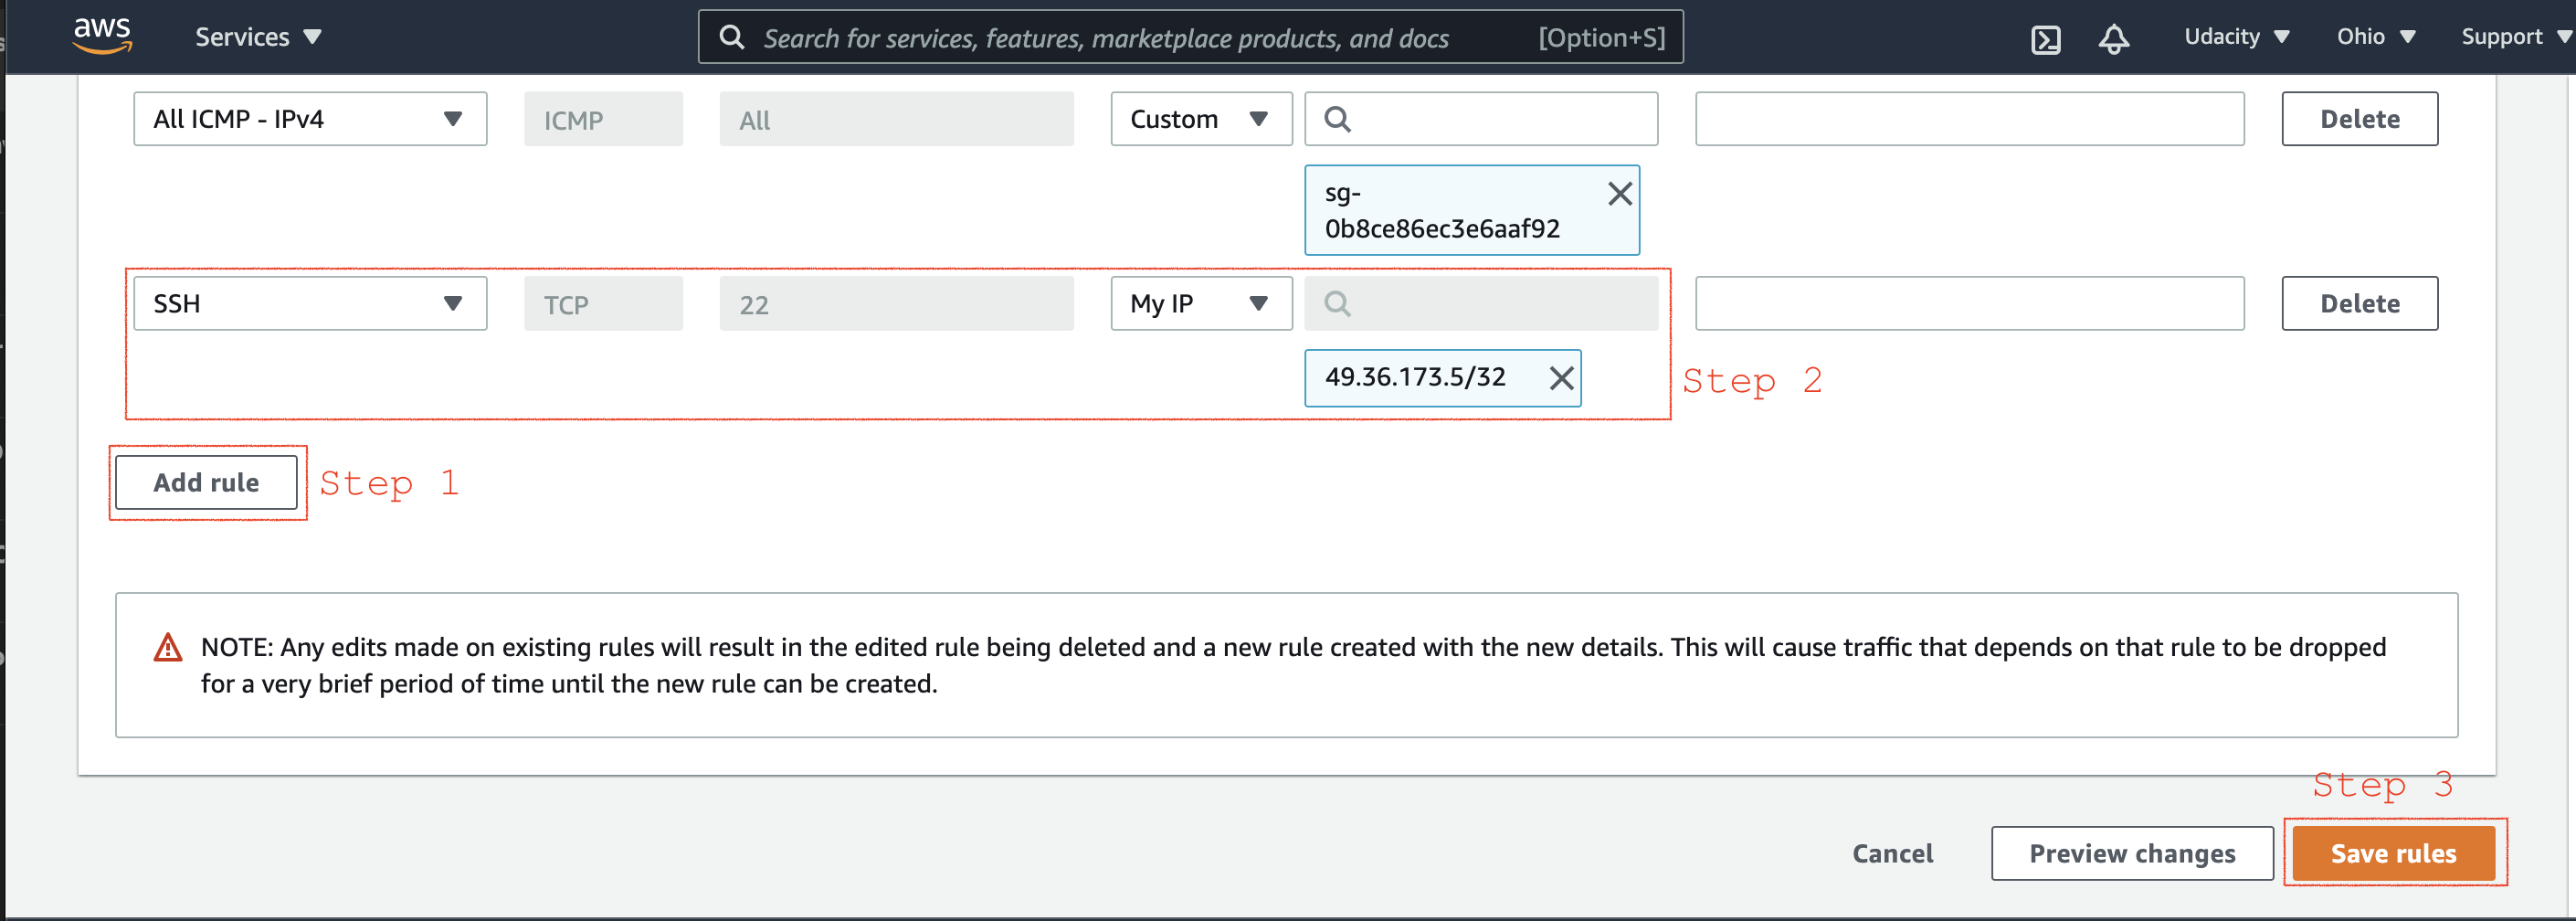
Add new inbound SSH traffic (port 22) from your local IP
- Reference - Authorize inbound traffic
2.4. Verify connection to the Master node
- Go to the EC2 dashboard, and select the instance you want to connect using the SSH protocol.
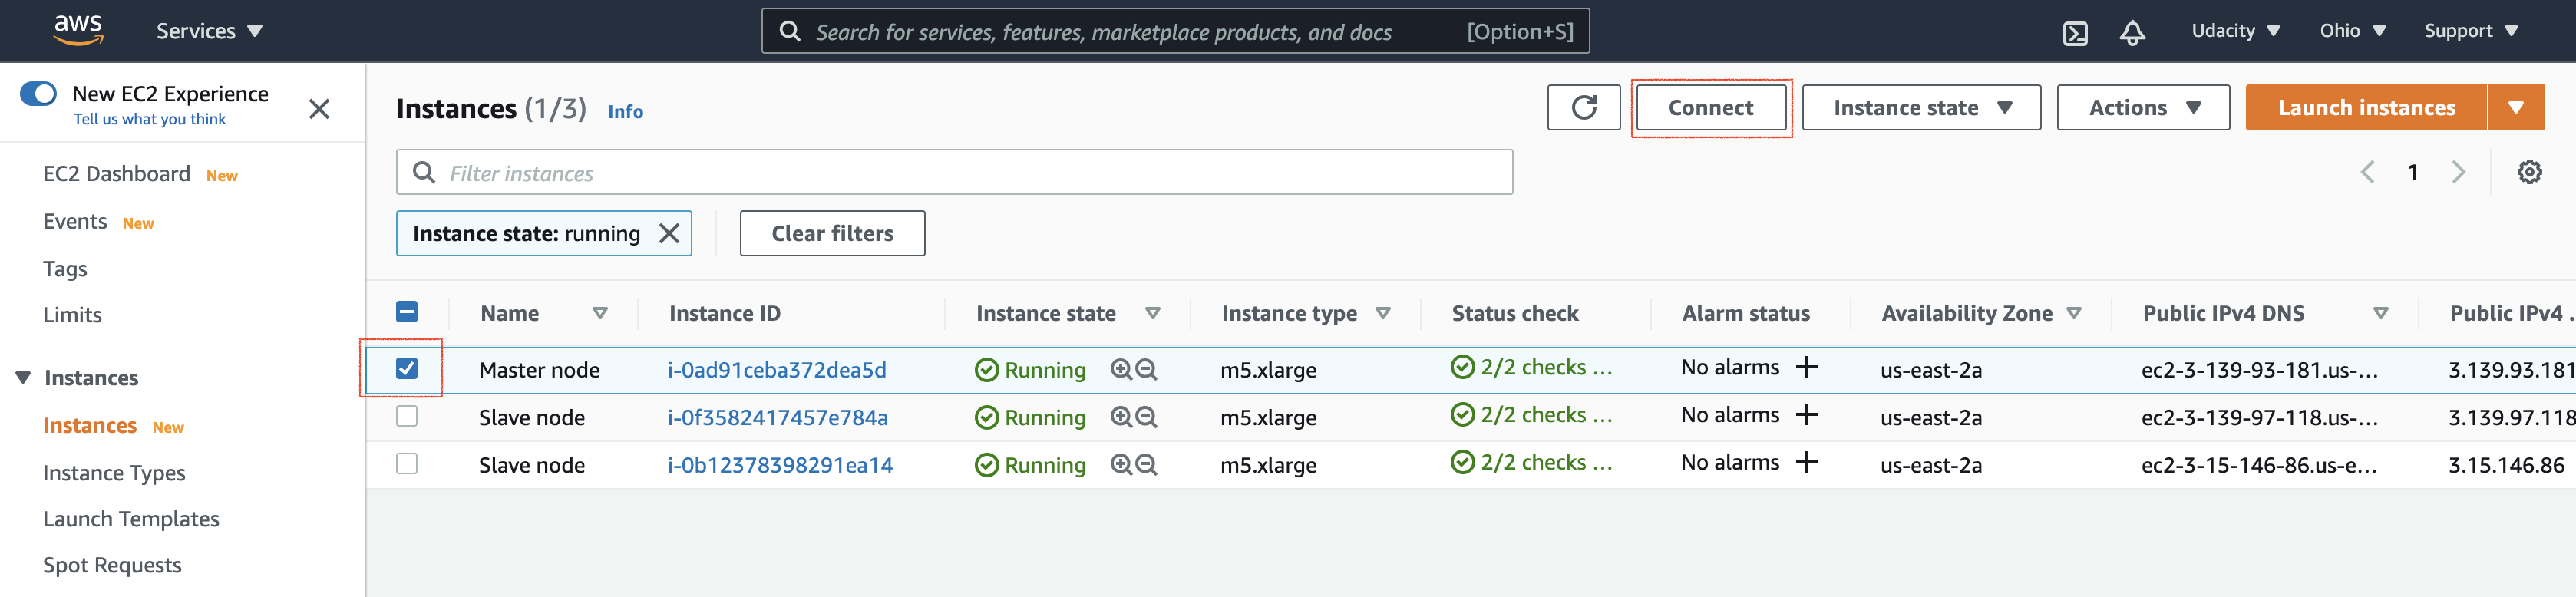
Select the instance to connect
- Connect using the SSH protocol. You can run the commands shown in the figure below in your terminal.
Note - In the snapshot below, the user name to log in is not root. Instead, you must use ** hadoop**. For example, use
ssh -i AWS_EC2_Demo.pem hadoop@ec2-3-139-93-181.us-east-2.compute.amazonaws.com
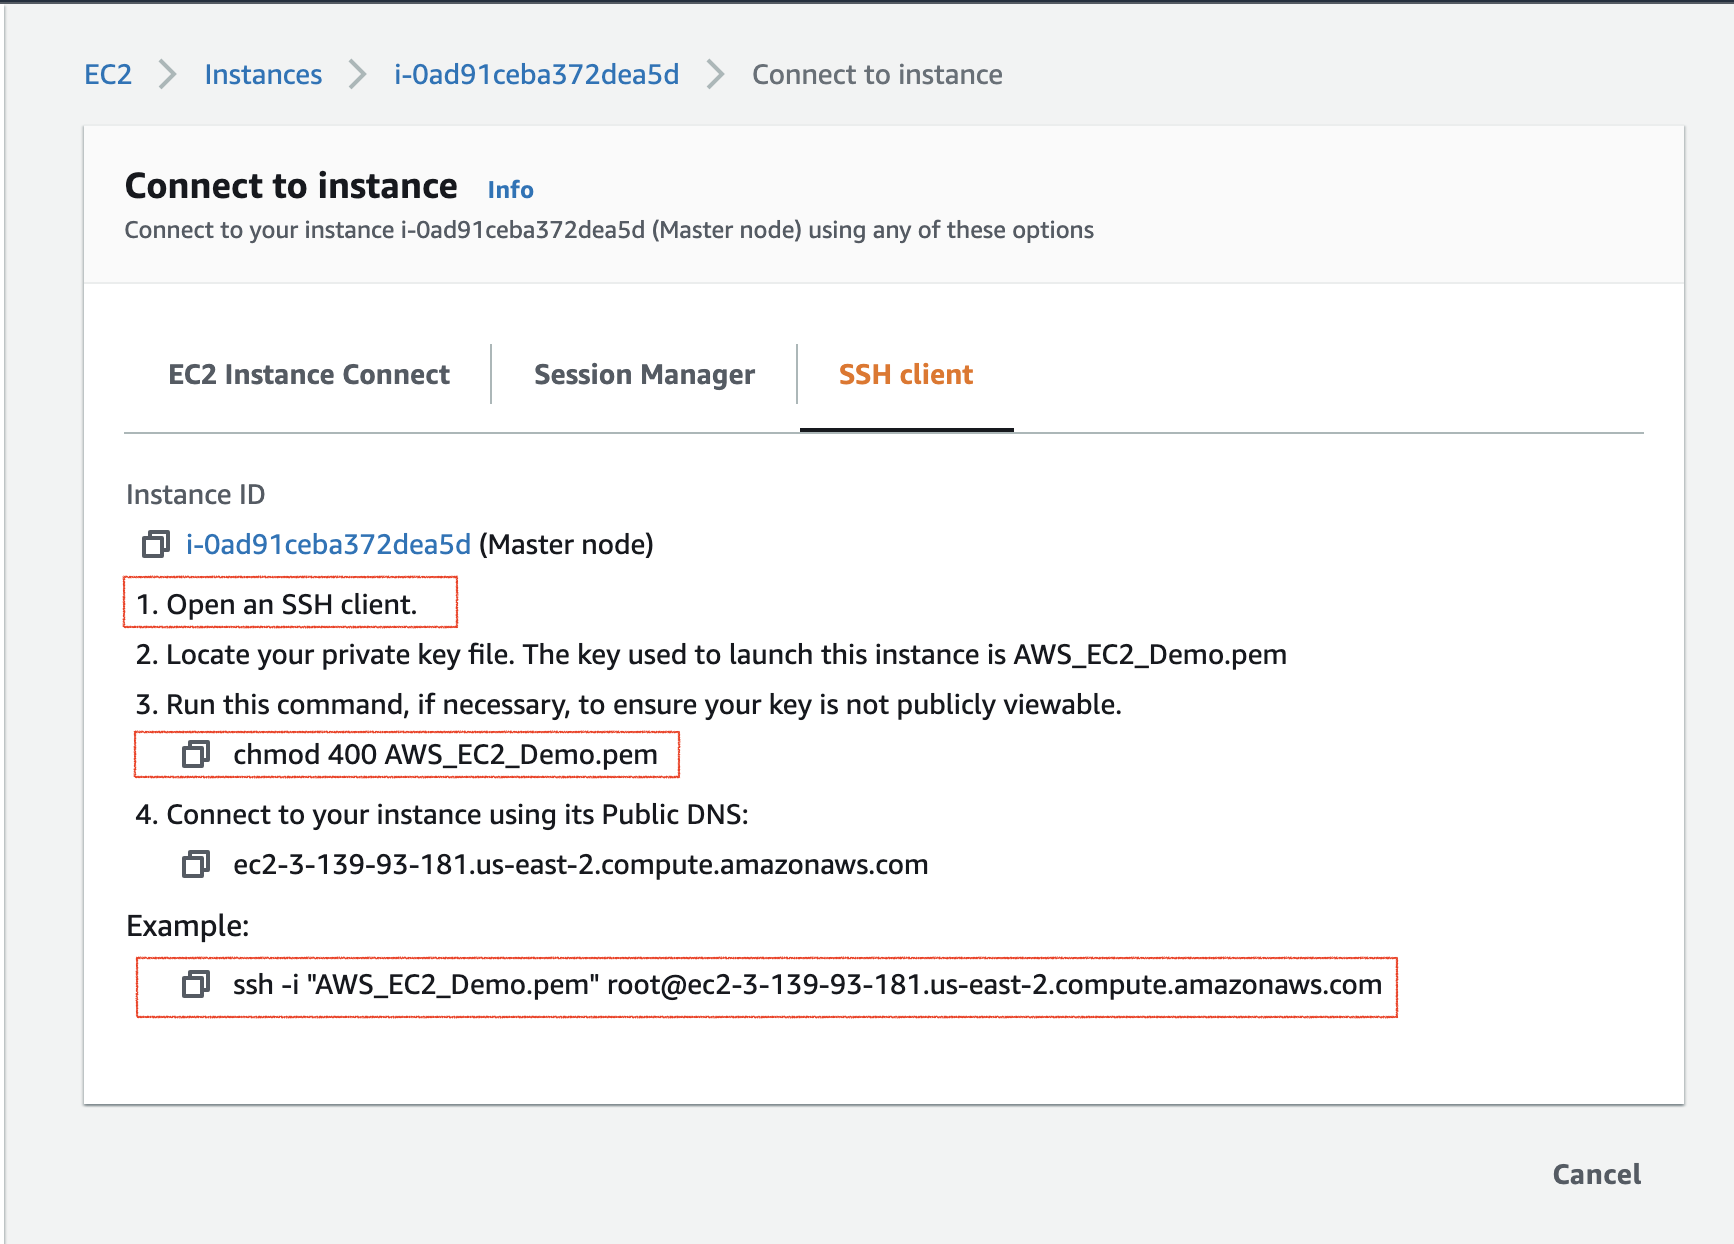
Steps to connect using SSH protocol. After a successful connection, you can exit your connection.
- Reference - Connect to the Master Node Using SSH.
2.5. View Spark UI hosted on the EMR Clusters
One last thing to do before using the Jupyter Notebook, or even browsing the Spark UI, is to set up a proxy in your browser. It is a two-step process.
Step 1. Set Up an SSH Tunnel to the Master Node Using Dynamic Port Forwarding
- Enable the dynamic port forwarding using the command. This command does not returns a response.
ssh -i AWS_EC2_Demo.pem -N -D 8157 hadoop@ec2-3-139-93-181.us-east-2.compute.amazonaws.comReplace the .pem file name and the master node public DNS for you. In the above example, the .pem is residing in the present working folder. If your .pem is placed in any different folder, you can provide the complete path.
In the command above, the -D option is used for specifying a local port (8157) to forward data to all remote ports on the master node's web server.
- Now, you'd want to copy your .pem file (EC2 log in private key) to the master node. You can securely copy your .pem file from your local computer to the master node, using:
scp -i AWS_EC2_Demo.pem AWS_EC2_Demo.pem hadoop@ec2-3-139-93-181.us-east-2.compute.amazonaws.com:/home/hadoop/You can use a similar command to copy any other script, if required.
Step 2. Configure Proxy Settings in your Local Computer
To do this, you'll need to install an extension in your browser. Here are the options:
- Chrome - SwitchyOmega or FoxyProxy
- Firefox - FoxyProxy
The snapshots below present the step for the Chrome browser. For other browsers, you can follow the reference link present at the end of the section.
- Go to the https://chrome.google.com/webstore/category/extensions, and add for Proxy SwitchyOmega extension to your Chrome browser.
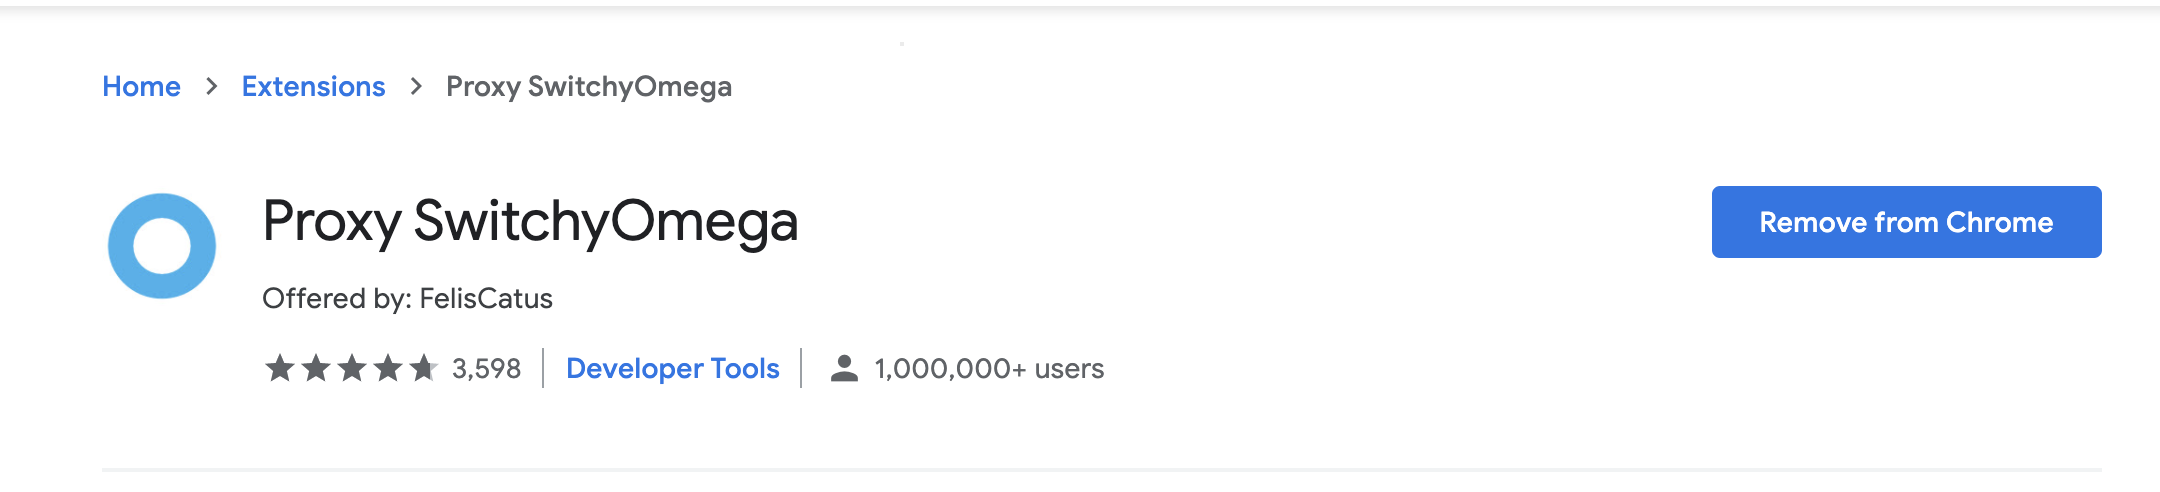
SwitchyOmega extension on Chrome
- Create a new profile with name
emr-socks-proxyand select PAC profile type.
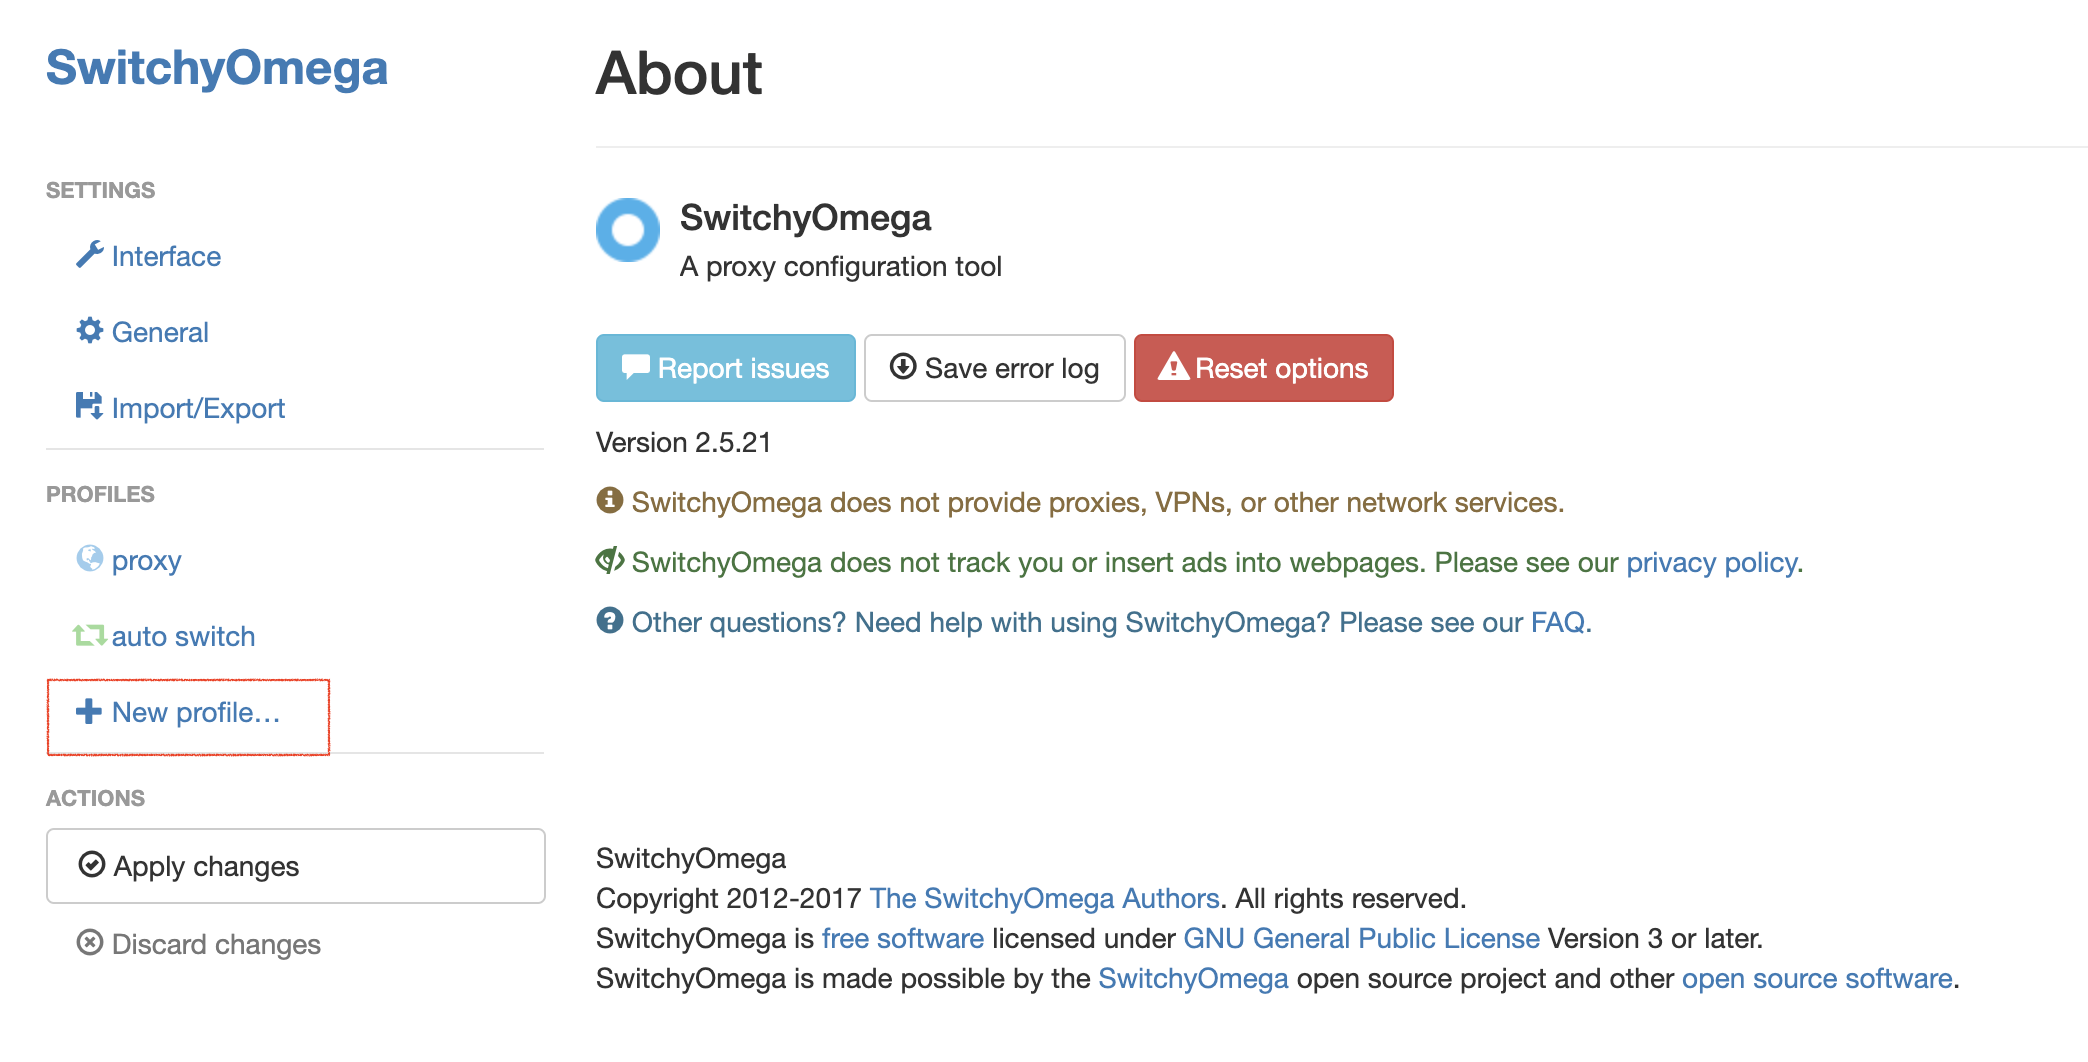
Create a new profile in SwitchyOmega
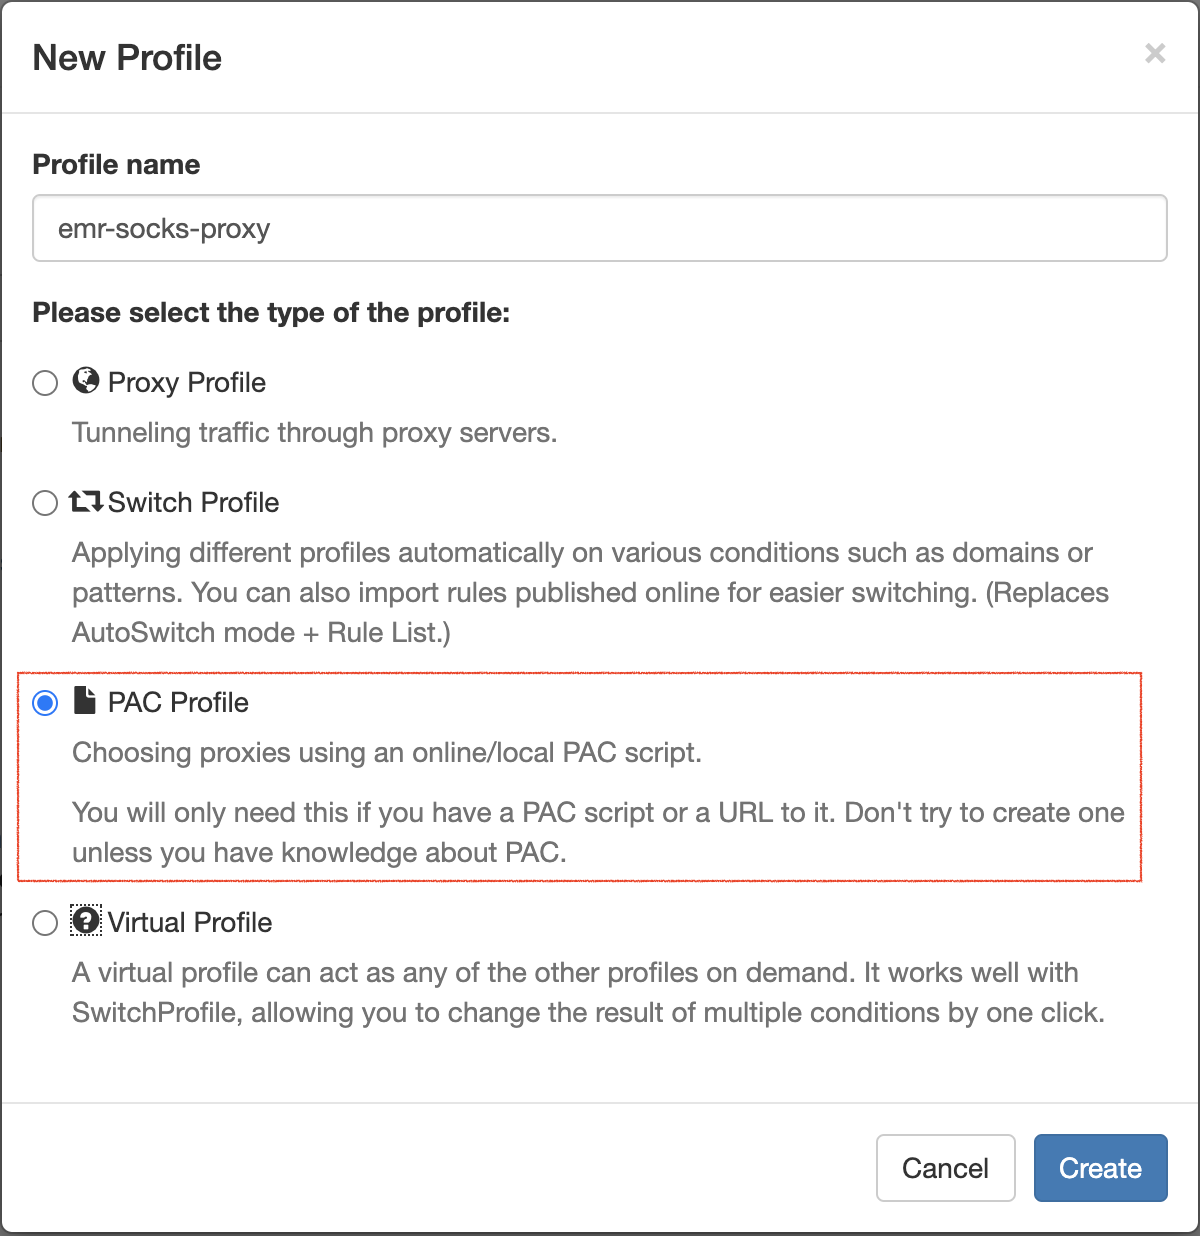
Enter the profile name and choose a profile type
- Save the following profile script in your new profile:
function FindProxyForURL(url, host) {
    if (shExpMatch(url, "*ec2*.amazonaws.com*")) return 'SOCKS5 localhost:8157';
    if (shExpMatch(url, "*ec2*.compute*")) return 'SOCKS5 localhost:8157';
    if (shExpMatch(url, "http://10.*")) return 'SOCKS5 localhost:8157';
    if (shExpMatch(url, "*10*.compute*")) return 'SOCKS5 localhost:8157';
    if (shExpMatch(url, "*10*.amazonaws.com*")) return 'SOCKS5 localhost:8157';
    if (shExpMatch(url, "*.compute.internal*")) return 'SOCKS5 localhost:8157';
    if (shExpMatch(url, "*ec2.internal*")) return 'SOCKS5 localhost:8157';
    return 'DIRECT';
}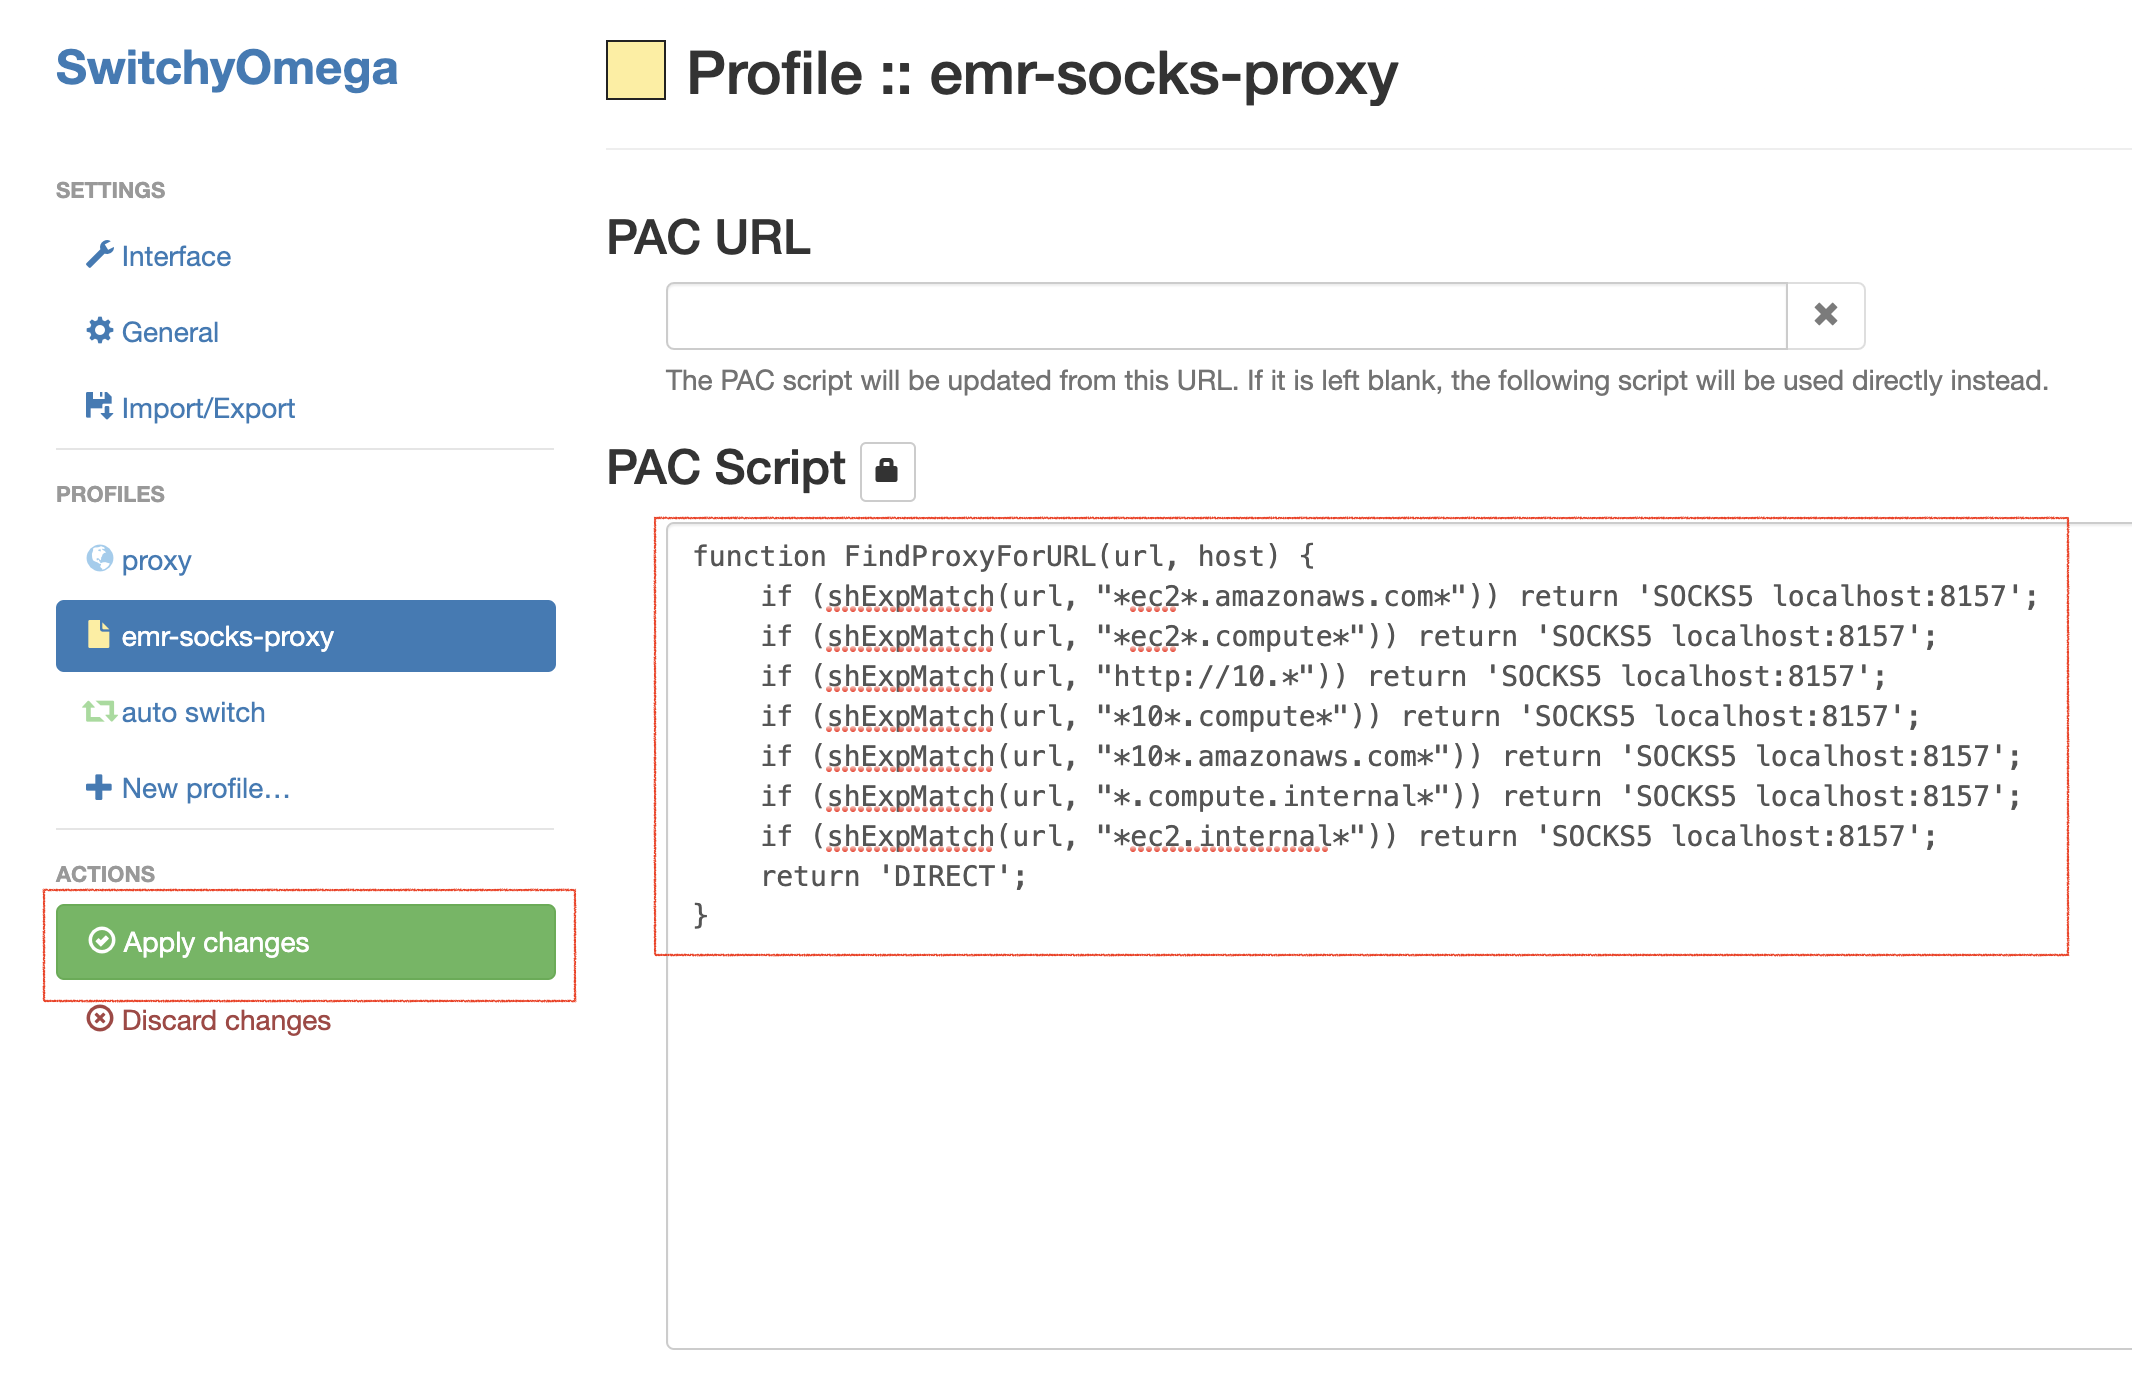
Apply changes to the new profile
- Enable the
emr-socks-proxyprofile.
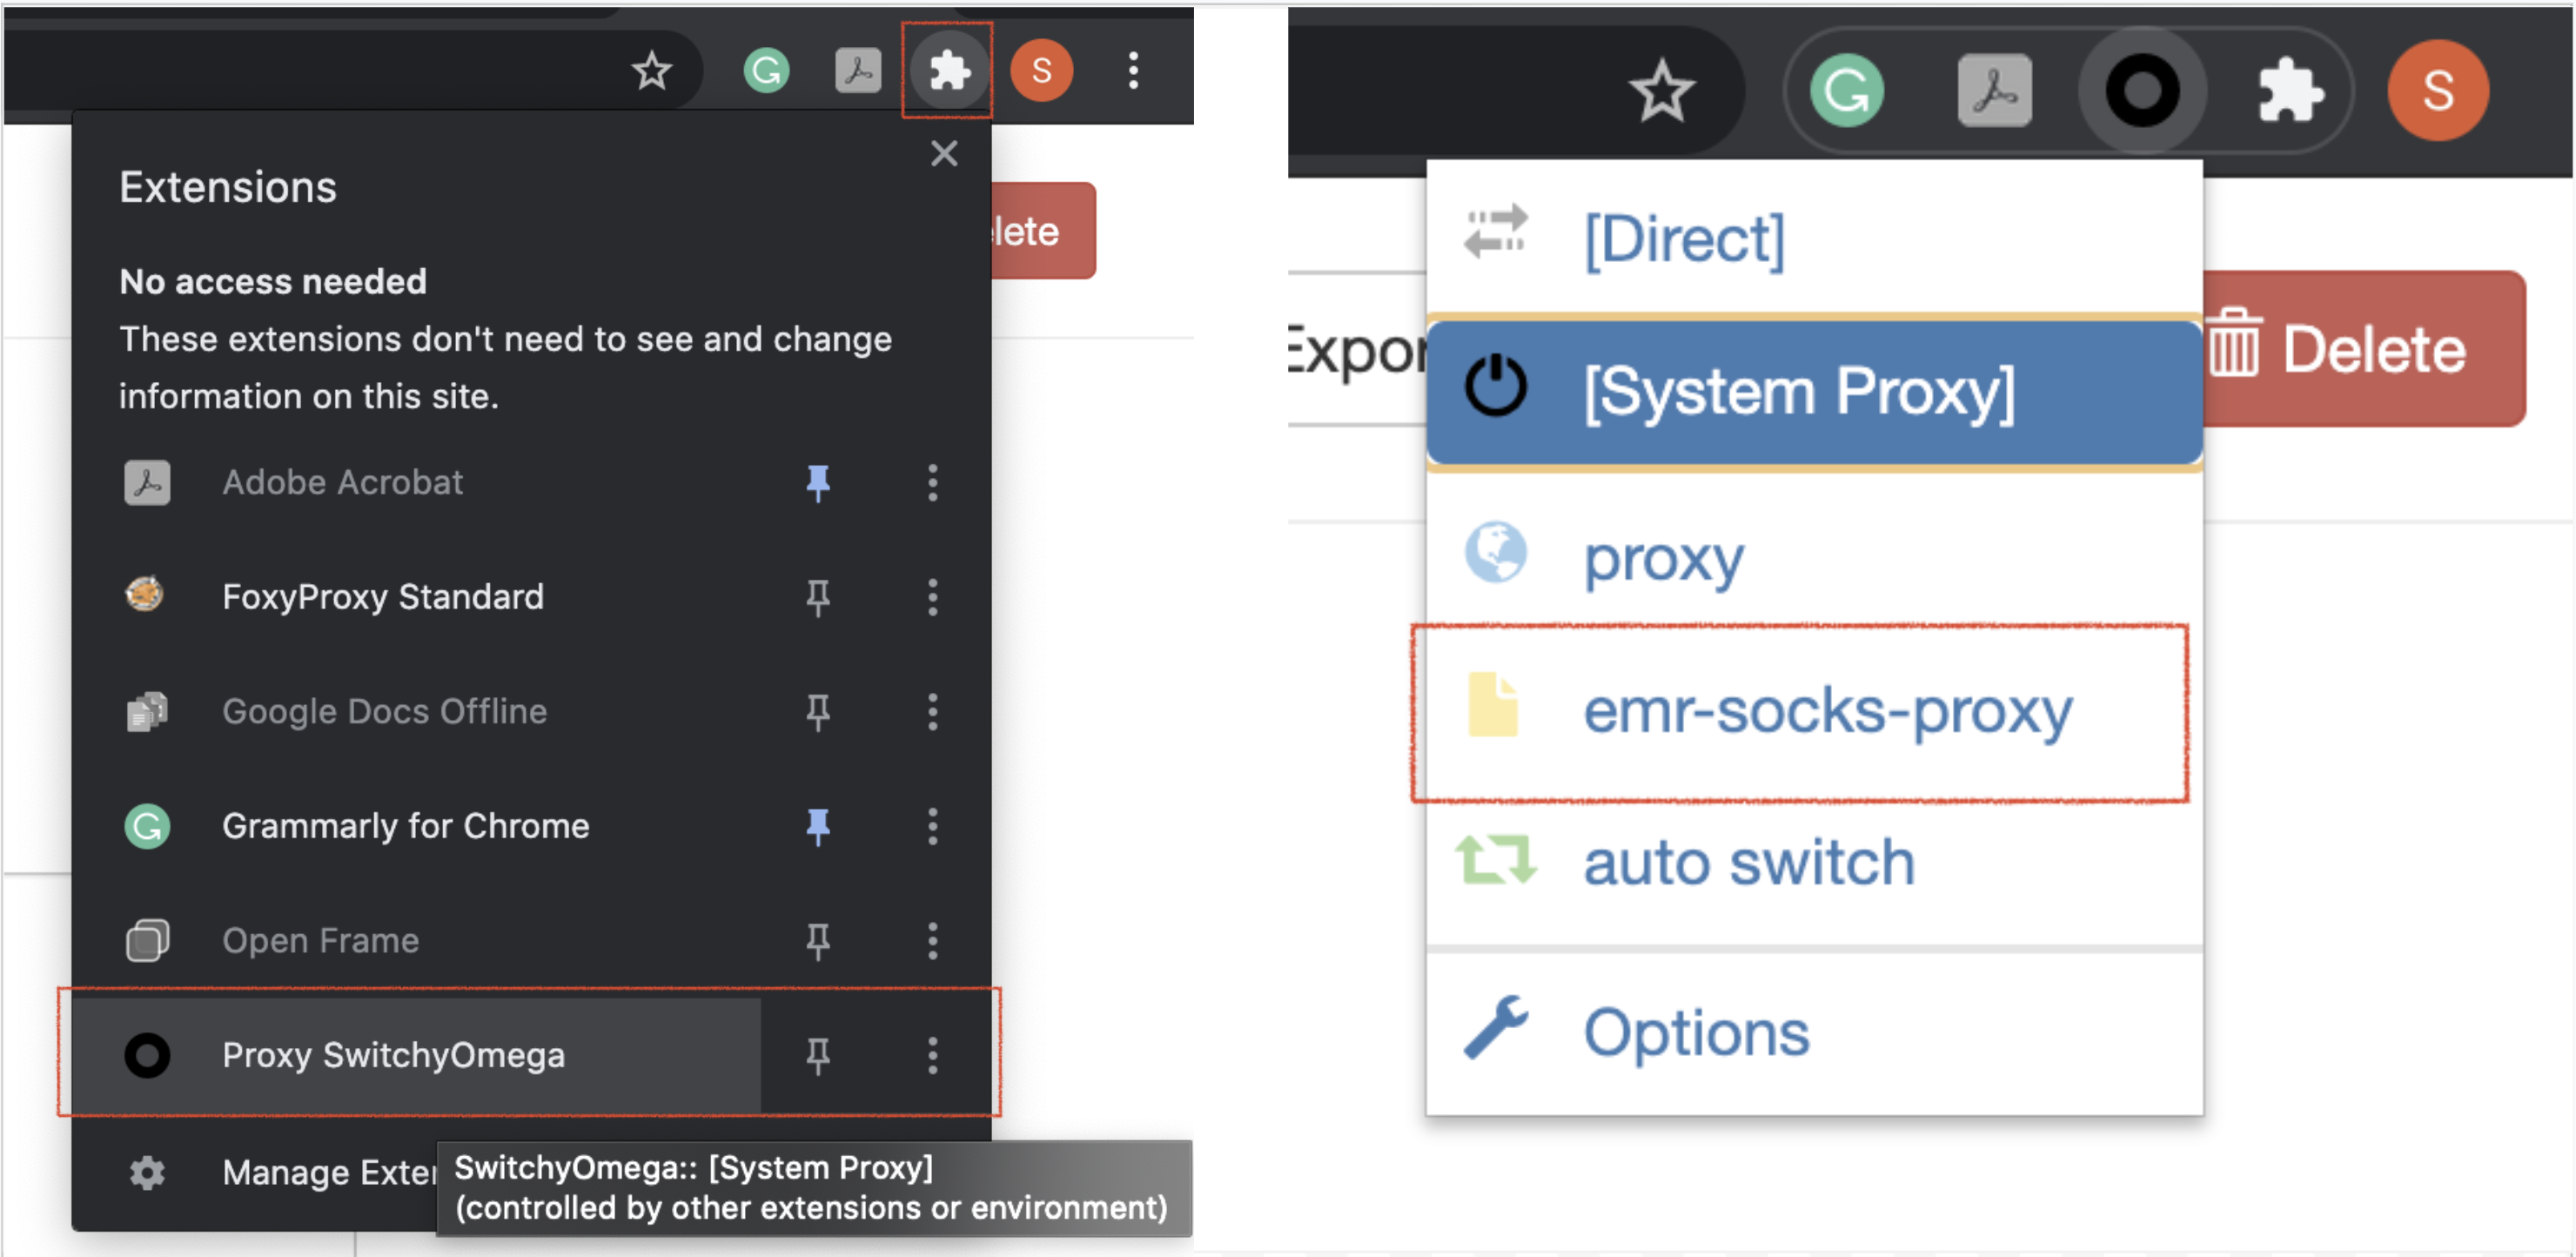
Enable the new SwitchyOmega profile
- Once, you have configured the proxy, you can access the Spark UI using the command (replace the master node public DNS for you):
http://ec2-3-139-93-181.us-east-2.compute.amazonaws.com:18080/
Spark UI, accessed from the CLI (note the URL above). Though, you can access the same Spark UI by selecting the cluster summary from the EMR console → Clusters, and clicking on the Persistent user interface hyperlink.
Note - Do not forget to Terminate your EMR cluster after your exercise is finished.